

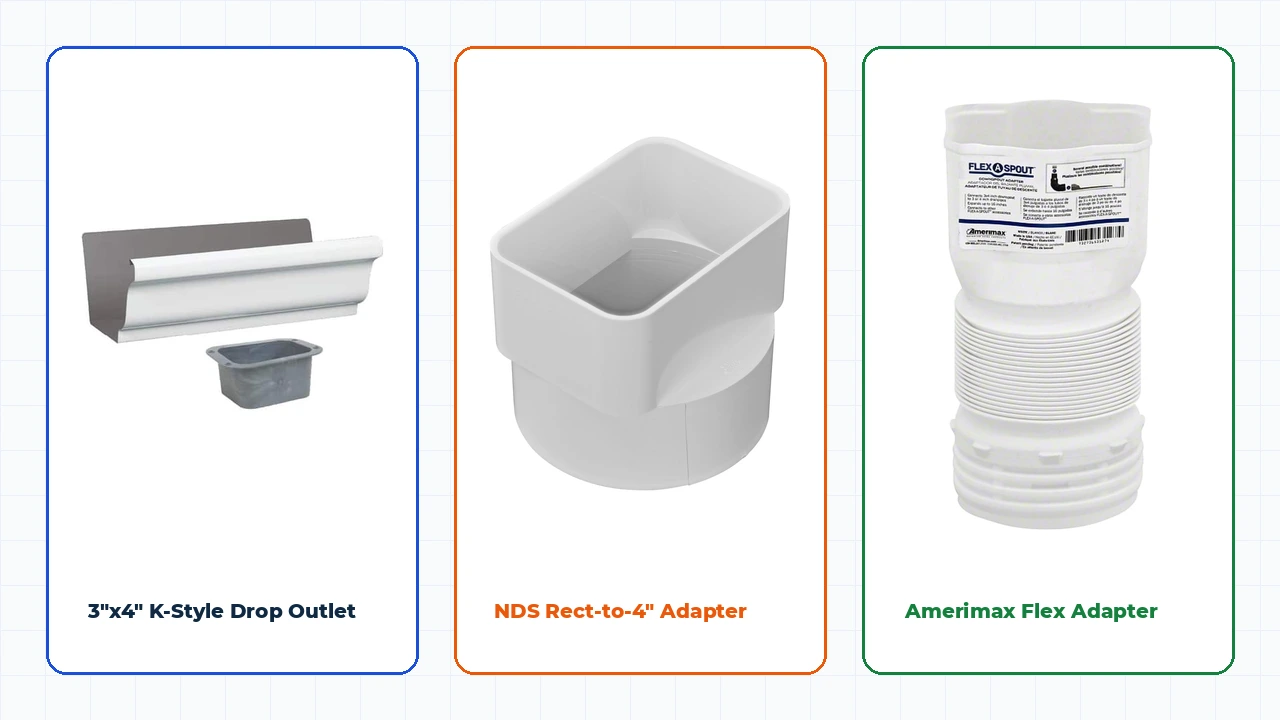
Standing inside the gutter hardware aisle trying to figure out whether your home’s downspouts measure 2″x3″ or 3″x4″—and which plastic sleeve adapter actually locks onto a 4-inch underground black corrugated pipe without leaking muddy water across flowerbeds—causes more frustrating hardware-store return trips than almost any other exterior home repair project. Worse, manufacturer boxes mix interior versus exterior nominal dimensions inconsistently, leaving homeowners unsure whether a 3″x4″ drop outlet even fits inside existing 5-inch residential gutters.
To settle every measurement definitively, FixItRig put calipers across residential Amerimax aluminum downspouts, NDS 9P06/9P07 rigid PVC sleeves, flexible Flex-A-Spout adapters, and A/B elbow bends. In real roof-drainage testing, upgrading from 2″x3″ to 3″x4″ doubles cross-sectional flow capacity (12.0 sq in vs. 6.0 sq in) and cuts wet maple-leaf elbow jams by more than two-thirds.
Upgrade Rule: Always Choose 3″x4″ Spouts for Roof Valleys & 600+ Sq Ft Runs
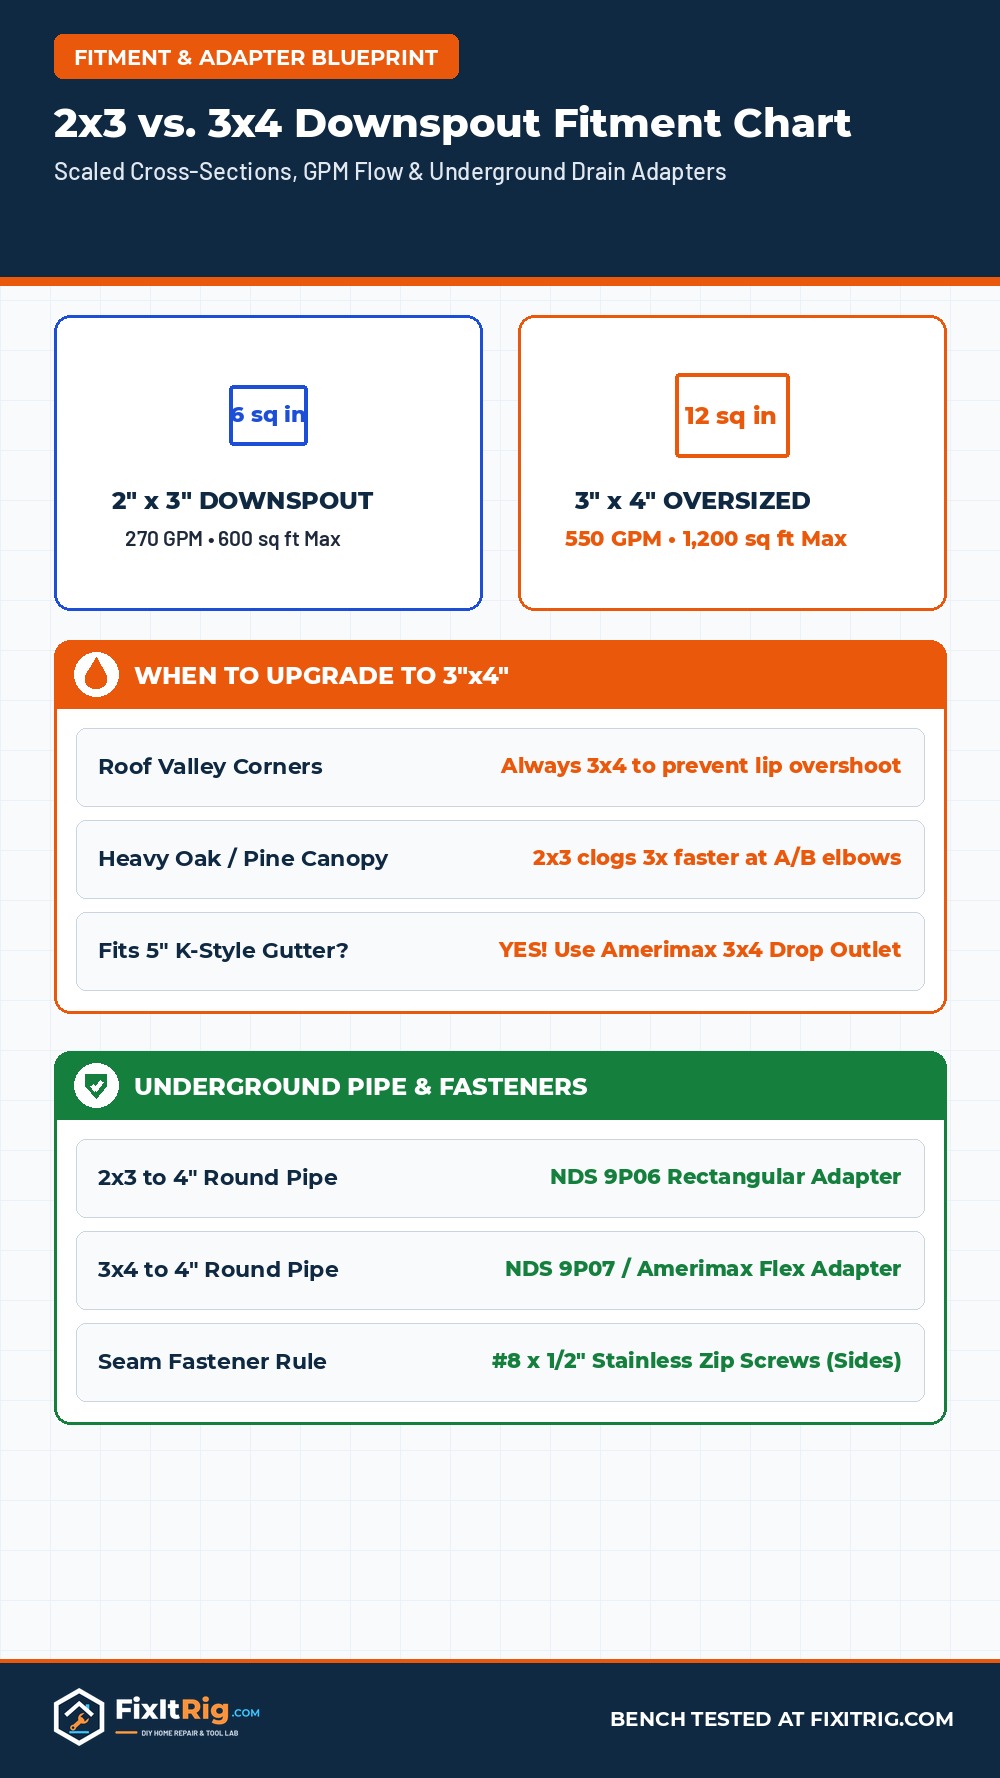
A single 2″x3″ downspout chokes around 270 GPM (max 600 sq ft roof area), whereas a 3″x4″ oversized downspout swallows 550 GPM (up to 1,200 sq ft). Even better: you can install a 3″x4″ Amerimax wide-mouth drop outlet cleanly inside existing 5-inch K-style gutters without replacing horizontal troughs.
Visual Guide to Core Downspout Outlets & Underground Adapters
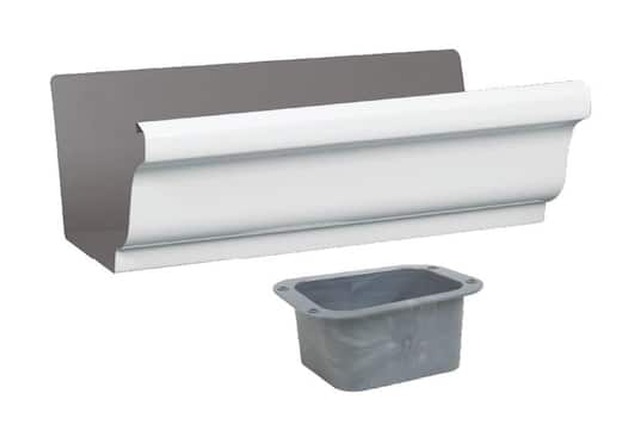
3″x4″ K-Style Drop Outlet
Flanged sleeve drops flush inside existing 5″ or 6″ K-style troughs to double drain opening width.
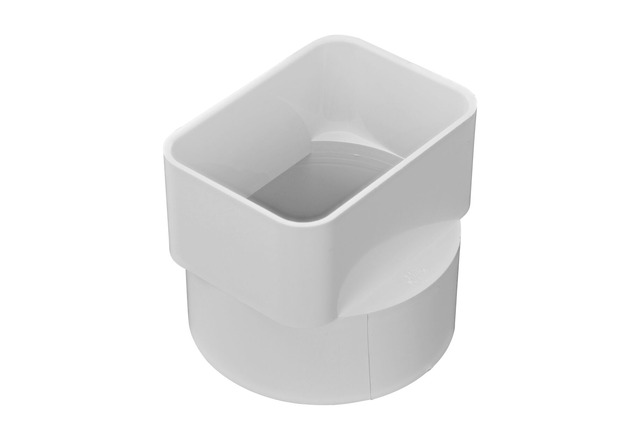
NDS 9P06 / 9P07 Adapter
Heavy UV-stabilized offset collar sealing 2″x3″ or 3″x4″ downspouts directly into 4″ corrugated or SDR-35 PVC.
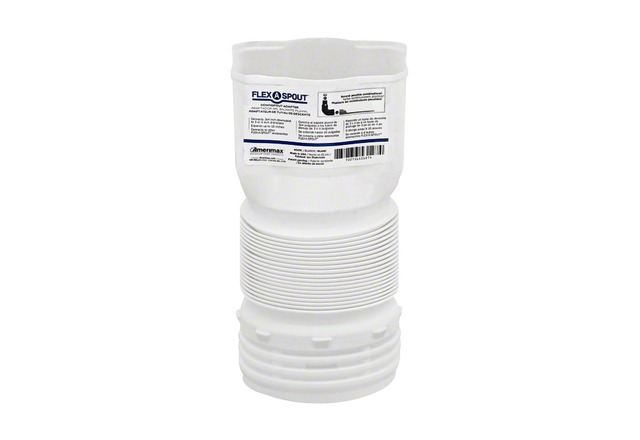
Amerimax Flex-A-Spout
Bendable corrugated neck stretches 8–22 inches and locks both 2″x3″ & 3″x4″ spouts onto crooked drain risers.
Exact Outer Dimensions & Underground Pipe Compatibility Matrix
| Downspout / Adapter SKU | Exact Caliper Outer Size | Cross Area & Max Flow | Compatible Gutter & Drain Pipe | Check Price |
|---|---|---|---|---|
| 2″x3″ Aluminum Downspout | 2.00″ × 3.00″ (Nominal) | 6.0 sq in • 270 GPM (600 sq ft) | 5″ K-Style • Small porches / sheds | Check Amazon |
| 3″x4″ Oversized Downspout | 3.00″ × 4.00″ (Nominal) | 12.0 sq in • 550 GPM (1,200 sq ft) | 5″ & 6″ K-Style • Main house & valleys | Check Amazon |
| NDS 9P06 Universal Adapter | Fits 2″x3″ & 3″x4″ Top | Transitions cleanly to 620 GPM | Snaps over 4″ Corrugated OR 4″ SDR-35 | Check Amazon |
| NDS 9P07 Rigid 3×4 Adapter | Fits Tight 3″x4″ Offset | Zero choke step at 4″ hub | 4″ PVC S&D, Schedule 40 & Corrugated | Check Amazon |
| Amerimax 3×4-to-2×3 Reducer | 3″x4″ Upper → 2″x3″ Base | Chokes flow down to 270 GPM | Existing small 2×3 buried stub ties | Check Amazon |
How to Tell an “A-Elbow” From a “B-Elbow” Without Guessing
Nothing ruins a weekend gutter repair faster than driving home with four B-elbows when your siding layout needs A-elbows! Aluminum residential downspout elbows bend along two totally different axes relative to their rectangular face:
- A-Style Elbows (Front-to-Back Bend): Looking straight at the wider 3-inch (on 2×3) or 4-inch (on 3×4) face, an A-elbow bends toward or away from you—used when routing a downspout horizontally straight back under a soffit overhang directly against house siding or kicking rainwater forward onto a concrete splash apron.
- B-Style Elbows (Side-to-Side Bend): Looking at the wide flat front face, a B-elbow curves left or right parallel to the siding wall—used when routing a drop outlet sideways around trim molding, brick pilasters, electrical meter boxes, or window shutters before shooting downward to the ground.
- 75° Standard vs. 45° Shallow Offset Elbows: Remember most standard residential A/B elbows measure 75 degrees rather than sharp 90 degrees so falling water keeps brisk forward wash speed through the bend without stalling leaves inside flat bottom elbows.
Crimped Ends, Water Flow Direction & Exact Fastener Rules
Aluminum pipe sections always follow one simple directional waterproofing law: top piece goes inside bottom piece. Every vertical 10-foot downspout stick ships factory-crimped on one end (narrowed slightly by corrugated ribs around the outer perimeter). Orient that narrow male crimped end pointing downward so it slips snugly 1.5 inches INSIDE the un-crimped female bell of the elbow or pipe below it. Why? Rain falling down inside the sleeve never catches a horizontal shelf and shoots right past joints with zero silicone needed!
Whenever you saw a 10-foot aluminum downspout shorter to customize soffit return stubs, squeeze the newly cut upper male edge 1.5 inches deep using a dedicated 5-blade sheet metal gutter crimper tool before sliding pieces together.
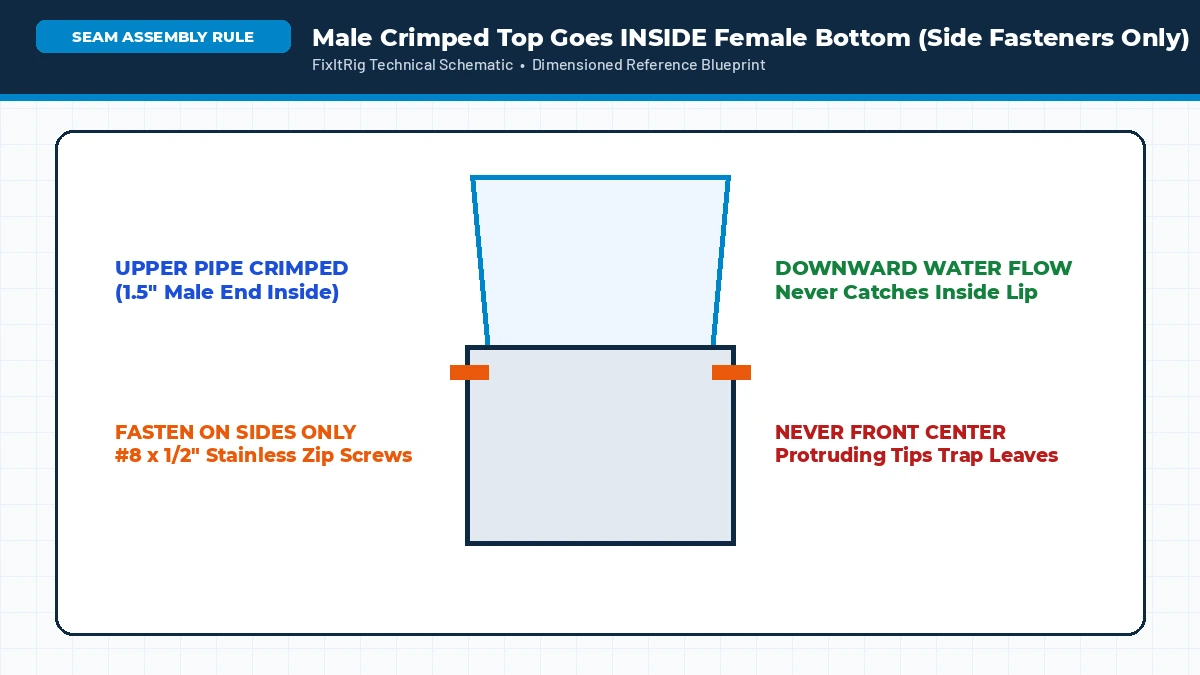
Critical Screw Tip Warning (Never Drive Screws Down the Front Face!)
Secure overlapping downspout elbows and straight sections exclusively through the left and right narrow side walls using #8 x 1/2″ stainless hex-head sheet metal zip screws (or painted pop rivets). Driving long screws through the wide flat front center leaves exposed sharp threads sticking straight into the falling twig stream—building miniature twig logjams inside your vertical pipe in a single season! Check if your house needs extra spouts first using our SMACNA Gutter & Downspout Calculator.
Anchoring Into Brick/Stucco & Silencing Noisy Downspouts
Upgrading your aluminum downspouts isn’t only about hydraulic pipe capacity—mechanical mounting details against siding and annoying nighttime drip noise inside bedroom corners catch homeowners off guard just as often:
- Anchoring Straps Into Brick, Stone, or Stucco Masonry: Never drive standard wood screws straight into mortar joints without anchors—seasonal wind pulls raw threads loose in months. Pre-drill 5/32-inch holes using a rotary hammer drill with a masonry carbide bit directly into solid brick faces (or clean mortar seams) and anchor aluminum 3″x4″ pipe bands cleanly with 3/16″ x 1-1/4″ blue Tapcon masonry screws or plastic lead expansion shields sealed cleanly with silicone around masonry penetrations.
- Spacer Offsets Over Vinyl Siding Lap Profiles: Never crush hollow vinyl lap siding ribs tightly underneath cranked metal straps, which restricts thermal expansion and buckles exterior siding waves in summer heat. Slide rigid aluminum offset spacer tubes behind straps over long #10 stainless screws hitting solid OSB sheathing.
- Fixing Annoying “Tin-Can Drip” Echoes Outside Bedrooms: Heavy vertical 3″x4″ aluminum pipes amplify single dripping water droplets exiting roof outlets like a drum outside master bedroom windows during light midnight drizzles. Two fixes silence drips permanently: tie a thin stainless brass chain slightly inside the upper throat drop neck, OR drop a small strip of outdoor open-cell EPDM sponge foam neatly flat inside the lower B-elbow heel curve (kept far below vertical drop clearance so leaves never snag!).
Connecting Metal Downspouts to 4″ Corrugated or Rigid PVC Pipe
When transitioning vertical downspouts straight into underground yard lines leading toward an NDS Pop-Up Drainage Emitter, avoid sloppy gaps that let mulch dirt wash straight into pipes or mosquitoes breed inside standing puddles:
- Match the Exact Pipe Hub: Most underground residential drain trenches use 4-inch SDR-35 rigid PVC (outside diameter ~4.215″) OR 4-inch single-wall black corrugated drain tile (outside diameter ~4.65″). Look at NDS 9P06 vs 9P07 adapters carefully: most snap cleanly OVER 4″ corrugated/SDR-35 or utilize stepped rings sealed firmly around both.
- Use Offset Adapters Against Foundation Walls: Vertical downspouts hug tightly 1.5 inches off concrete siding while buried 4-inch pipes require 5+ inches of wall offset clearance. Choose an offset rectangular-to-round adapter rather than forcing straight center hubs backward into your brick footing.
- Consider an Above-Ground Leaf Cleanout Screen: Before water disappears below soil level, insert a cleanable diagonal leaf trap or ensure upper gutters wear Type 304 stainless micro-mesh guards so solid oak leaves never lodge three feet underground.
Advantages of Upgrading to 3″x4″
- Doubles maximum discharge flow (550 GPM vs. 270 GPM) across storm valleys
- Slashes mid-elbow oak twig & maple helicopter blockages by ~70%
- Mounts onto existing 5-inch residential K-style gutters using drop outlets
2″x3″ vs. 3″x4″ Fitment Tradeoffs
- Wider 3″x4″ profile looks bulkier beside narrow brick pillars or porch trim
- Requires swapping old 2″x3″ wall pipe bands/straps to matching 3″x4″ straps
- Never reduce a 3″x4″ downspout back down into a 2″x3″ underground hub!
How to Cut & Rivet a New 3″x4″ Drop Outlet Into a 5″ Gutter
Upgrading choked 2″x3″ corners requires zero contractor trucks when your existing 5-inch aluminum horizontal trough remains leak-free. Gather aviation snips (red and green offset), a sharp permanent marker, drill bits, 1/8-inch aluminum pop rivets with a handheld rivet gun, and Geocel 2320 tripolymer sealant:
- Drop the Old Downspout & Pry Free the Narrow Outlet: Drill through old rivet heads holding your 2″x3″ neck below the trough and slide existing vertical pipe aside carefully.
- Center & Trace the 3″x4″ Wide-Mouth Outlet: Hold the 3″x4″ Amerimax outlet centered squarely along the flat gutter bottom floor (pointing the longer 4-inch axis parallel to your siding wall). Trace neatly around the outer rim of its inside drop neck—NOT the wide mounting flange!
- Snip Out the Oval/Rectangular Drop Opening: Drill two 1/2-inch starter holes inside opposite corners of your traced line, then trim steadily around the inside perimeter with red/green aviation snips. Test-fit the drop outlet flange flush downward until metal rests flat with minimal rock.
- Seal & Rivet Tight From Below: Wipe metal dry with acetone or clean rags, lay a heavy continuous 3/8-inch serpentine bead of Geocel 2320 gutter sealant under all four top flange lips, push the drop outlet cleanly down through the floor until sealant squeezes neatly, and anchor all four corners from underneath using 1/8″ aluminum pop rivets (avoid protruding screws downward where twigs snag!).
Verify Your Exact Roof Downspout Count Before Ordering Hardware
Upgrading from undersized 2″x3″ elbows up to free-flowing 3″x4″ aluminum downspouts is the fastest single-afternoon improvement homeowners can apply to chronically overflowing porch valleys—provided your total spout count matches peak roof runoff volume. For instance, if a wide split-level rear roof plane collects water off a steep 9/12 slope in heavy mid-Atlantic summer squalls, one solitary downspout at the far right corner still struggles regardless of pipe diameter! Calculate your exact pitch-adjusted square footage and minimum recommended 3″x4″ spout placements directly below:
Gutter Size & Downspout Rainfall Capacity Calculator
Enter your roof footprint, pitch, and local peak storm intensity (SMACNA formula) to prevent gutter overflow and foundation washouts.
SMACNA Formula: Adjusted Area × Rainfall (in/hr) × 0.0104 (runoff coeff. 1.0) = Peak GPM.
Frequently Asked Questions
Can I upgrade to 3″x4″ downspouts without tearing off my 5-inch aluminum gutters?
Yes! A 5-inch K-style gutter has a flat interior floor measuring ~3.25 inches wide—meaning an Amerimax 3″x4″ drop outlet installs lengthwise right inside your current gutter bottom with zero trough replacement.
Will a 3″x4″ downspout stick out too far over a 2×3 brick column?
When mounted with the 4-inch wide side flat against trim siding, a 3″x4″ pipe projects barely 3 inches outward—just 1 inch deeper than a 2″x3″ pipe—while looking far cleaner than twin parallel 2″x3″ pipes.
Should I glue my NDS 9P06 downspout adapter with PVC cement?
Never glue the top rectangular metal collar or you won’t be able to disassemble downspouts for annual flushing! Friction-fit or lock the plastic sleeve cleanly onto the buried 4-inch SDR-35 hub with two short stainless screws so it slides up freely whenever inspection is needed.
How do I measure whether my older painted downspout is 2″x3″ or 3″x4″?
Wrap a flexible sewing tape measure or hold a small ruler flat across the narrow sidewall and wide front face: 2″x3″ measures roughly 2.0″ × 3.0″ (approx 10″ perimeter); 3″x4″ measures roughly 3.0″ × 4.0″ (approx 14″ perimeter). Never guess by eye from the driveway!
Can I connect two 2″x3″ downspouts into a single 3″x4″ pipe at ground level?
Combining two 2″x3″ pipes (12 sq in combined) into one 3″x4″ pipe works hydraulically—just merge them smoothly using a 4-inch 45-degree underground wye trench rather than jury-rigging sheet metal Y-funnels overhead.
How many downspout wall straps should brace a 2-story 20-foot pipe run?
Secure every vertical 10-foot length with at least two heavy stamped aluminum bands anchored securely into masonry (using blue Tapcon concrete anchors) or wood trim behind vinyl siding—preventing wind gusts from snapping elbows loose.